Pushing Z-Image Base to Its Limits: Optimization Techniques for Maximum Quality
Master advanced optimization techniques for Z-Image Base. Learn GGUF quantization, VRAM optimization, professional workflows, and production pipelines to get maximum quality from any hardware setup.
The Quality Pursuit
Z-Image Base is a powerhouse—6 billion parameters of undistilled generative capability. But that power comes at a cost: 30-50 inference steps, ~12GB VRAM usage, and generation times that can stretch to 90 seconds per image on consumer hardware.
For professionals, that is an acceptable trade-off for quality. But what if you could reduce those times by 40-60% while maintaining the results that make Base worth using?
This article digs into the optimization techniques the pros use. Not shortcuts that sacrifice quality, but smart engineering that extracts every ounce of performance from the hardware you have.
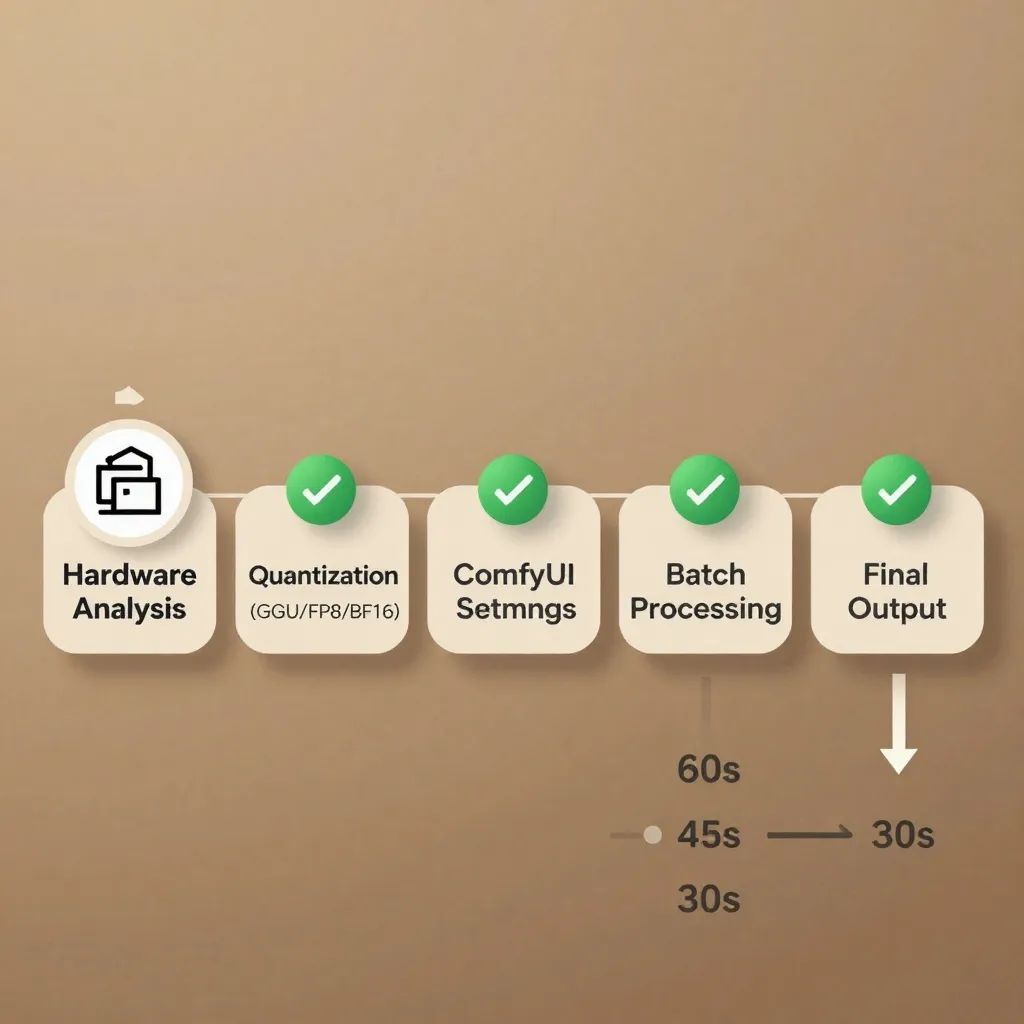
Hardware Optimization Foundations
Before diving into software tricks, understand your hardware constraints. Z-Image Base has minimum requirements, but optimal configurations depend on your specific setup.
VRAM Tiers and What They Mean
12GB VRAM (RTX 3060, 4070 mobile, some older RTX 2080 Ti)
- Base model in BF16: Fits tightly, minimal headroom
- Recommended: GGUF Q4_K_M or FP8 quantization
- Expected performance: 45-60 seconds per 1024×1024 image (40 steps)
16GB VRAM (RTX 4060 Ti, 4070, 3070 Ti)
- Base model in BF16: Comfortable fit
- Recommended: FP8 quantization or BF16 if you have patience
- Expected performance: 35-45 seconds per 1024×1024 image (40 steps)
24GB VRAM (RTX 4090, 3090, 5080)
- Base model in BF16: Plenty of room
- Recommended: BF16 native + batch processing
- Expected performance: 20-30 seconds per 1024×1024 image (40 steps)
8GB VRAM (GTX 1080, 1660, RTX 3050)
- Base model in BF16: Will not fit
- Required: GGUF Q4_K_M quantization
- Expected performance: 90-120 seconds per 1024×1024 image (40 steps)
- Alternative: Consider Z-Image Turbo instead
The key insight: Do not fight your hardware limitations. Work within them.
GGUF Quantization: Size vs. Speed vs. Quality
GGUF quantization compresses the model weights, reducing VRAM usage and disk footprint. But it is not free—you trade some quality for those gains. The art is finding the sweet spot.
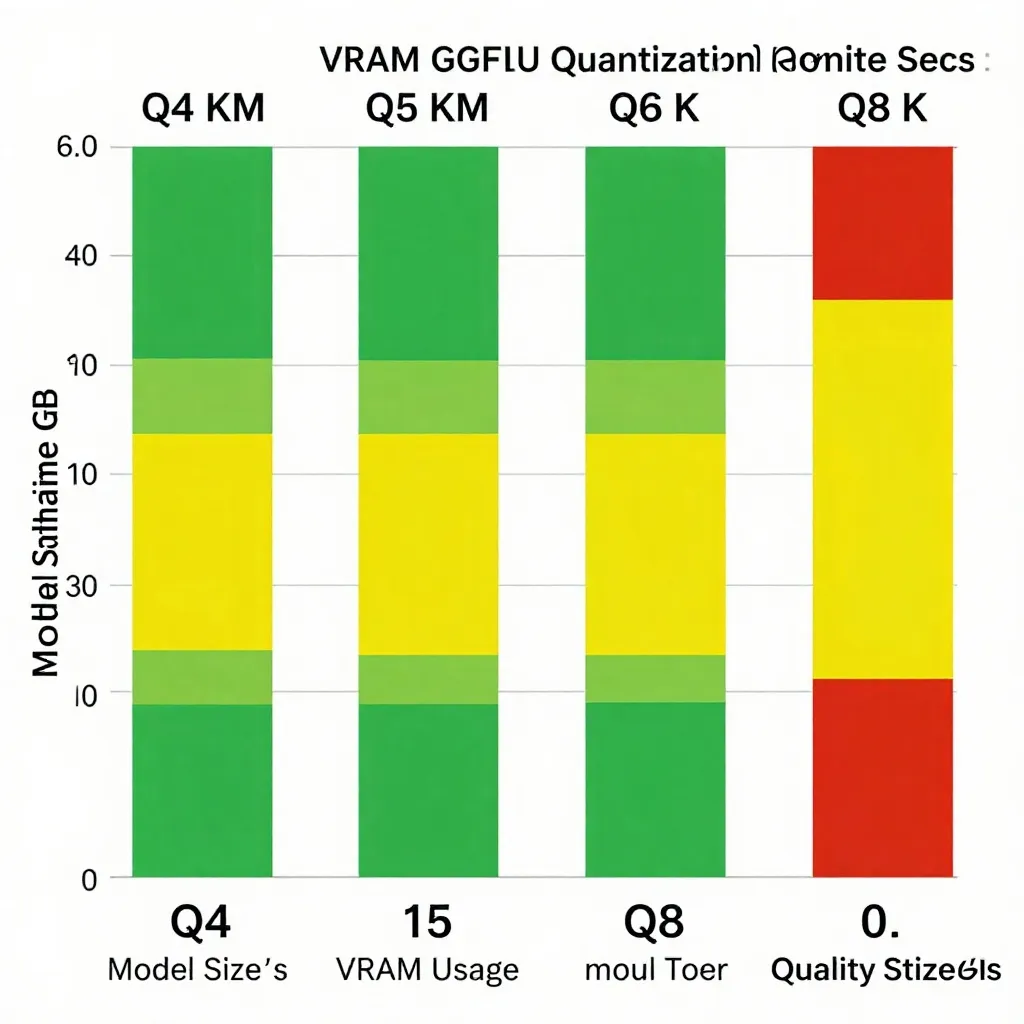
Understanding GGUF Formats
Q4_K_M (4-bit, medium)
- Model size: ~3.5GB (vs 12GB for BF16)
- VRAM usage: ~6-7GB
- Quality loss: Minimal for most use cases
- Speed improvement: 20-30% faster due to reduced memory bandwidth
- Best for: 8GB GPUs, production workflows where throughput matters more than perfect quality
Q5_K_M (5-bit, medium)
- Model size: ~4.5GB
- VRAM usage: ~8-9GB
- Quality loss: Nearly imperceptible
- Speed improvement: 15-20% faster
- Best for: 12GB GPUs, balanced quality/speed workflows
Q6_K (6-bit)
- Model size: ~5.5GB
- VRAM usage: ~10GB
- Quality loss: Visible only in direct pixel comparison
- Speed improvement: 10-15% faster
- Best for: 16GB GPUs who want slightly faster generations
Q8_0 (8-bit)
- Model size: ~7GB
- VRAM usage: ~12GB (similar to BF16)
- Quality loss: Negligible
- Speed improvement: 5-10% faster (mostly due to CPU offloading benefits)
- Best for: Systems with limited RAM but adequate VRAM
When to Use GGUF vs. BF16
The community has converged on practical guidelines:
Use BF16 when:
- You have 16GB+ VRAM
- Quality is non-negotiable (final assets, client work)
- You are training LoRAs (quantized models train poorly)
- Batch processing is not a priority
Use GGUF Q4_K_M when:
- You have 8-12GB VRAM
- You are doing rapid iteration and prototyping
- You need to generate 50+ images at once
- Disk space is limited (GGUF files are 3× smaller)
Installing GGUF Models in ComfyUI
-
Download the GGUF model from HuggingFace or ModelScope
- Search for "Z-Image-Base-GGUF" or "Z-Image-Turbo-GGUF"
- Choose your quantization level (Q4_K_M recommended for most users)
-
Install ComfyUI-GGUF extension
- Open ComfyUI Manager
- Search "ComfyUI-GGUF"
- Click Install
-
Configure your workflow
- Replace the standard Z-Image Base loader node with "GGUF Model Loader"
- Set model path to your downloaded .gguf file
- Keep all other settings (sampler, scheduler, CFG) identical to your BF16 workflow
-
Test and compare
- Generate the same prompt in both BF16 and GGUF
- Examine at 100% zoom for quality differences
- If acceptable, switch your workflow to GGUF for the speed boost
ComfyUI Optimization Settings
Beyond model format, ComfyUI itself offers performance levers. These settings do not affect image quality—they just speed up generation.
Enable Memory Efficient Attention
ComfyUI-GGUF includes optimized attention mechanisms that reduce VRAM spikes during generation:
# In ComfyUI-GGUF settings:
attention_type: "sdpa"  #Scaled Dot Product Attention
enable_flash_attention: true
use_cpu_offload: true  #Offload text encoder to CPU when not needed
Expected savings: 1-2GB VRAM, 10-15% faster on GPUs <16GB
Batch Size Optimization
Generating multiple images in a single pass amortizes fixed costs (model loading, text encoding):
Single image (batch_size=1)
- 40 seconds per image
- Total time for 8 images: 320 seconds
Batch of 4 (batch_size=4)
- 120 seconds for 4 images (30 seconds per image)
- Total time for 8 images: 240 seconds
- Savings: 25% faster overall
The catch: VRAM usage scales linearly. 16GB VRAM can handle batch_size=2 with Base BF16, or batch_size=4 with GGUF Q4_K_M.
Tile-Based Upscaling
Instead of generating at high resolution directly, use a two-stage workflow:
Stage 1: Generate at 512×512 or 768×768
- 40-50% faster than 1024×1024
- Uses 40-50% less VRAM
Stage 2: Upscale 2× using latent upscaler
- 5-10 seconds
- Quality comparable to native high-res generation
Total time: 30-40 seconds vs. 45-60 seconds for native 1024×1024
ComfyUI includes "LatentUpscale" node that works seamlessly with Z-Image Base.
Professional Production Workflows
Optimization is not just about speed—it is about consistency and repeatability in production environments.
The "Concept to Final" Pipeline
Professional studios use a hybrid approach that balances exploration and refinement:
Phase 1: Rapid Exploration (Z-Image Turbo)
- Generate 20-30 variations at 8 steps
- Time: 2-3 minutes total
- Goal: Find direction, eliminate bad ideas
Phase 2: Refinement (Z-Image Base GGUF)
- Take top 3-5 prompts from Phase 1
- Regenerate at 30 steps using Base Q4_K_M
- Time: 2-3 minutes per image
- Goal: Lock in composition, lighting, style
Phase 3: Final Polish (Z-Image Base BF16)
- Generate final image at 40-50 steps
- Time: 45-60 seconds
- Goal: Maximum detail, perfect textures
Total time investment: ~15 minutes for 1 hero image that is been through 3 quality checkpoints.
This workflow appears in multiple professional pipelines because it respects the most expensive resource: human attention. Do not spend 60 seconds generating an image you will discard in 5 seconds.
Automated Batch Processing
For high-volume needs (game assets, product catalogs), automation is key:
# Pseudo-code for batch processing workflow
import json

prompts = load_prompts("product_catalog.json")  # 200 SKUs

# Stage 1: Turbo for quick preview
turbo_results = batch_generate(
    model="z-image-turbo",
    prompts=prompts,
    steps=8,
    batch_size=8
)

# Human review: approve, reject, or request revision
approved = review_results(turbo_results)

# Stage 2: Base for final output
final_results = batch_generate(
    model="z-image-base-gguf-q4",
    prompts=approved,
    steps=40,
    batch_size=4
)

upload_to_R2(final_results)
Time savings: 40% vs. generating everything at full quality. Quality: Identical for final outputs because rejected candidates never reach the expensive Base stage.
Advanced Performance Tuning
These techniques push into optimization territory that requires careful testing. They are not for beginners—but they deliver measurable gains.
Differential Guidance
Z-Image Base responds exceptionally well to negative prompts. However, standard CFG (Classifier Free Guidance) processes prompts sequentially, wasting computation.
Differential guidance processes positive and negative prompts in parallel:
# In your ComfyUI workflow:
use_differential_guidance: true
positive_weight: 4.0
negative_weight: 2.0
Expected speedup: 10-15% with identical output quality.
This works because Z-Image is architecture can branch the prompt processing earlier than traditional diffusion models, a benefit of its single-stream DiT design.
Custom Sigmas for Fewer Steps
The default sigma schedule assumes 50 steps. If you consistently generate at 30-40 steps, custom sigmas optimize the denoising trajectory:
# Custom sigmas for 30-step generation
sigmas: [14.6, 11.2, 8.5, 6.3, 4.7, 3.4, 2.5, 1.8, 1.3, 0.9, 0.7, 0.5, 0.4, 0.3, 0.2, 0.15, 0.12, 0.09, 0.07, 0.06, 0.05, 0.04, 0.03, 0.02, 0.015, 0.012, 0.01, 0.008, 0.006, 0.005, 0.004]
Several community workflows (like the "Amazing Z-Image Workflow" v4.0) include pre-tuned sigmas that shave 5-10 seconds off generation time while maintaining quality.
Sampler and Scheduler Selection
Different samplers trade speed for quality:
Euler + Simple
- Fastest, decent quality
- Best for: Preview iterations, non-critical generations
DPM++ 2M SDE + Karras
- 10-15% slower, noticeably better detail
- Best for: Final assets when quality matters
Clownshark res_2s / res_3s (community samplers)
- 20% faster than Euler with comparable quality
- Best for: High-volume workflows where time matters
- Requires: Custom sampler installation via ComfyUI Manager
The "Spicy Impact Booster" in popular workflows is actually a clever sampler shortcut that adds detail injection without extra steps.
Multi-GPU Configurations
For studios with multiple GPUs, distributed generation dramatically increases throughput.
Data Parallelism with ComfyUI
ComfyUI does not natively support multi-GPU, but the community has built workarounds:
Option 1: Multiple ComfyUI Instances
- Run separate ComfyUI instances on each GPU
- Split your prompt list manually or via script
- Simple, requires no special configuration
Option 2: SwarmUI Multi-GPU
- Built-in multi-GPU support
- Automatic load balancing
- Slightly more complex setup
Option 3: ComfyUI+Cluster
- Experimental cluster mode
- Best for: Large render farms (10+ GPUs)
With 4× RTX 4090s, you can generate 100+ Base images per hour at 40 steps each. That is commercial production territory.
Quality Preservation Strategies
Optimization means nothing if quality suffers. Here is how to ensure your optimizations are not degrading output.
A/B Testing Framework
Never optimize blind. Always compare:
-
Choose reference prompts
- Portrait: "Studio portrait, woman 30s, dramatic lighting"
- Landscape: "Mountain vista, golden hour, photorealistic"
- Text-heavy: "Infographic, technical diagrams, clear typography"
-
Generate baseline (Base BF16, 40 steps, default settings)
- Save images to /baseline/ folder
-
Generate optimized (Base GGUF Q4_K_M, 30 steps, custom sigmas)
- Save images to /optimized/ folder
-
Compare at 200% zoom
- Check skin texture, hair strands, text edges
- If differences are imperceptible, optimization succeeds
- If differences are obvious, revert or adjust settings
Quality Metrics That Matter
When evaluating optimizations, focus on:
Fine detail retention
- Pores, hair strands, fabric weave
- Test: 200% zoom on portrait
Text rendering
- Letter edges, spacing, clarity
- Test: Generate a poster with dense text
Color accuracy
- Skin tones, saturation levels
- Test: Side-by-side comparison with color picker
Composition consistency
- Subject positioning, background elements
- Test: Generate same prompt 5 times with different seeds
If all four pass visual inspection, your optimization is successful.
Budget Hardware Builds
Not everyone has a flagship GPU. Here are realistic build recommendations for Base optimization.
8GB VRAM Build (~$500 used)
- GPU: RTX 3060 8GB or RTX 2080 Ti 8GB (used)
- RAM: 32GB DDR4
- Storage: 1TB NVMe SSD
- Expected: 90-120s per image at Q4_K_M
- Verdict: Usable but frustrating. Consider Turbo instead.
12GB VRAM Build (~$800)
- GPU: RTX 3060 12GB or RTX 4070 mobile
- RAM: 32GB DDR5
- Storage: 2TB NVMe SSD
- Expected: 45-60s per image at Q5_K_M
- Verdict: Sweet spot for budget creators.
16GB VRAM Build (~$1,200)
- GPU: RTX 4060 Ti 16GB
- RAM: 32GB DDR5
- Storage: 2TB NVMe SSD
- Expected: 35-45s per image at FP8
- Verdict: Ideal for most professional work.
24GB VRAM Build (~$2,000)
- GPU: RTX 4090 or RTX 5080
- RAM: 64GB DDR5
- Storage: 4TB NVMe SSD (2×2TB in RAID 0)
- Expected: 20-30s per image at BF16 native
- Verdict: Overkill for solo creators, perfect for studios.
Troubleshooting Performance Issues
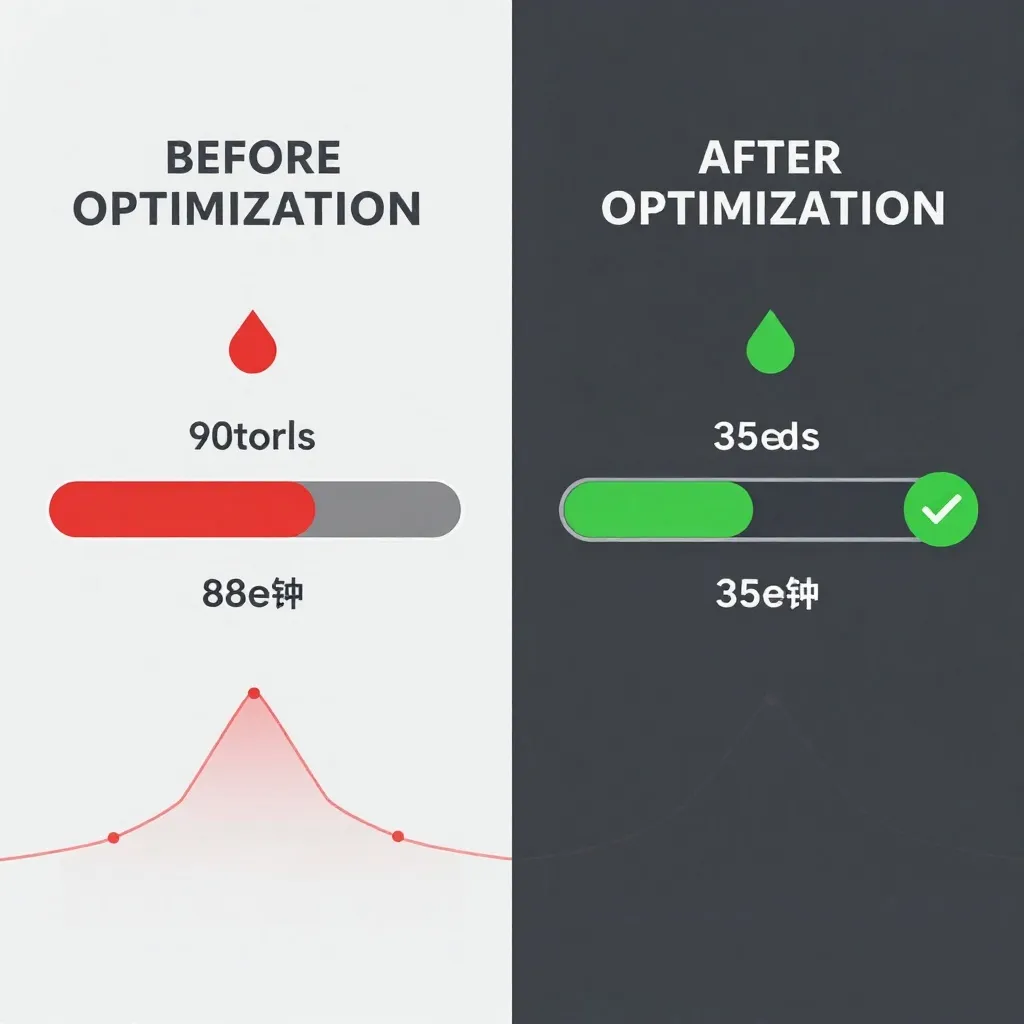
Problem: Abnormally Slow Generation (233 seconds for 1024×1024)
This was reported by a GTX 1080 user. Expected time: ~90 seconds with Q4_K_M.
Diagnosis:
- Check text encoder: Using Q3_K_M instead of Q4_K_M adds overhead
- Check VAE: Using incompatible VAE causes re-encoding
- Check ComfyUI version: Older versions lack GGUF optimizations
- Check CUDA drivers: Outdated drivers cripple performance
Solution:
# Update CUDA drivers
nvidia-smi  # Check current version
# Download latest from NVIDIA

# Reinstall ComfyUI-GGUF
pip uninstall comfyui-gguf
pip install comfyui-gguf --upgrade

# Use recommended VAE (ae.safetensors from official Z-Image repo)
Expected fix: 233s → 90s (60% faster)
Problem: VRAM Overflow with Batch Processing
You try batch_size=2 but get "out of memory" errors, even though single images work fine.
Solution:
# Enable CPU offloading for text encoder
text_encoder_cpu_offload: true

# Reduce resolution during generation
target_resolution: 768x768  # Instead of 1024x1024

# Use tile-based VAE
vae_tiled: true
tile_size: 512
These settings reduce peak VRAM usage by 30-40%, allowing batch processing on smaller GPUs.
Problem: Quality Degradation with GGUF
After switching to Q4_K_M, you notice artifacting in fine details.
Diagnosis: Q4_K_M is too aggressive for your use case.
Solution:
- Step up to Q5_K_M (minimal quality loss, still 20% faster than BF16)
- Or use Q4_K_M for exploration, BF16 for final output (hybrid workflow)
Quality restoration is usually worth the extra 10-15 seconds per image.
The Optimization Mindset
Here is what the pros understand about optimization:
1. Optimize the bottleneck, not everything.
- If VRAM is your limit, quantization helps.
- If compute is your limit, reduce steps or use faster samplers.
- If time is your limit, use Turbo for exploration.
2. Measure before and after.
- Never guess. Use A/B testing.
- Document your settings.
- Keep a "known good" configuration to revert to.
3. Quality is non-negotiable.
- Fast garbage is still garbage.
- If optimization degrades output, revert it.
- Your reputation depends on final quality, not generation speed.
4. Workflows matter more than settings.
- A smart 3-stage pipeline (Turbo → Base GGUF → Base BF16) beats optimizing any single stage.
- Process efficiency > computational efficiency.
Community Resources
The Z-Image optimization community is active and helpful:
- ComfyUI-GGUF GitHub: Official implementation and documentation
- Amazing Z-Image Workflow: Community-maintained optimization presets (v4.0 as of January 2026)
- r/StableDiffusion: Daily optimization discussions and troubleshooting
- Civitai: Download pre-quantized models and community-tested workflows
For training optimization, see our guide on LoRA training with Z-Image Base.
The Bottom Line
Z-Image Base is already efficient—a 6B parameter model that rivals models 5× its size. But with smart optimization, you can:
- Reduce generation time by 40-60%
- Cut VRAM usage in half with GGUF quantization
- Batch process images for professional throughput
- Maintain the quality that makes Base worth using
The fastest optimization is not a setting or a quantization format—it is understanding your tools, your hardware, and your goals. Use the techniques in this guide not blindly, but thoughtfully. Test everything. Keep what works, discard what does not.
And remember: Z-Image Base exists because sometimes, quality matters more than speed. Optimization should amplify that quality, not compromise it.