We've all been there. You generate a stunning AI image, but there's one tiny detail that's off. Maybe the subject isn't smiling, or the background is too cluttered. In the past, fixing this meant wrestling with complex inpainting masks, Photoshop, or simply re-rolling the dice and hoping for the best.
Enter Z-Image-Edit.
Z-Image-Edit changes the game by allowing you to edit images using natural language instructions. No masks, no brushes, just tell the AI what you want to change. In this guide, we'll move beyond the basics and show you how to master this powerful tool to create professional-grade edits in seconds.
.webp)
The future of editing is conversational.
Why Z-Image-Edit? The "Instruction" Advantage
Most AI editing tools rely on "inpainting," where you erase a part of the image and ask the AI to fill it in. While effective, it's manual and often lacks context. Z-Image-Edit, however, is trained to follow editing instructions. It understands the relationship between your command and the visual elements.
- Context Awareness: It knows that "make her smile" affects the mouth and eyes, not the hair.
- Global vs. Local: It can handle global changes (lighting, style) and local changes (objects) equally well.
- Efficiency: It's significantly faster than manual masking workflows.
Workflow 1: The "Expression Shift" (Portrait Retouching)
One of the hardest things to fix in post-production is a facial expression. With Z-Image-Edit, it's a single prompt.
The Goal: Change a neutral portrait to a warm smile.
The Prompt: "Make her smile warmly"
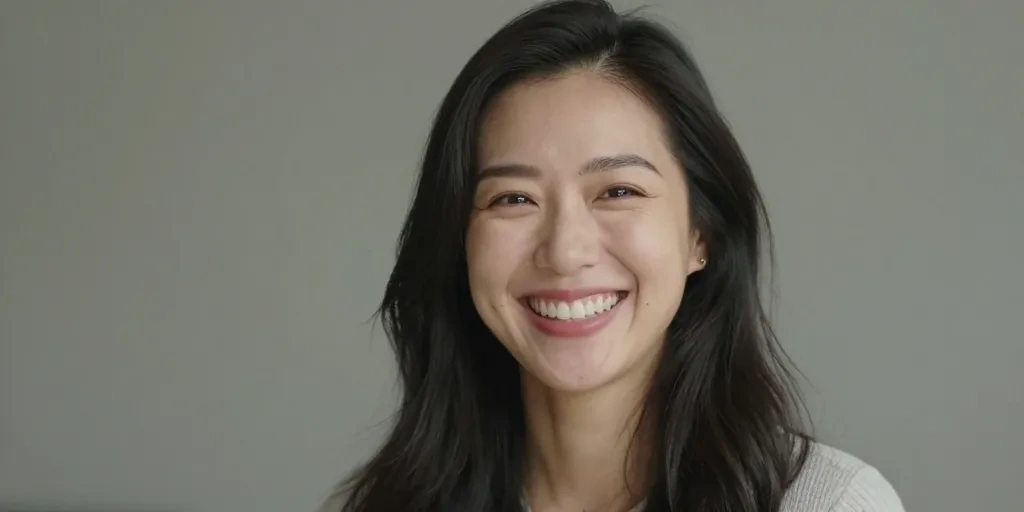
Notice how the edit isn't just stretching pixels. The eyes crinkle, the cheeks lift—the entire face adapts to the new emotion naturally.
Workflow 2: The "Scene Swap" (Product Photography)
E-commerce sellers, this is for you. You have a great product shot, but the white background is boring. You want lifestyle context.
The Goal: Move a perfume bottle from a studio to a forest.
The Prompt: "Change background to a misty forest on a mossy rock"
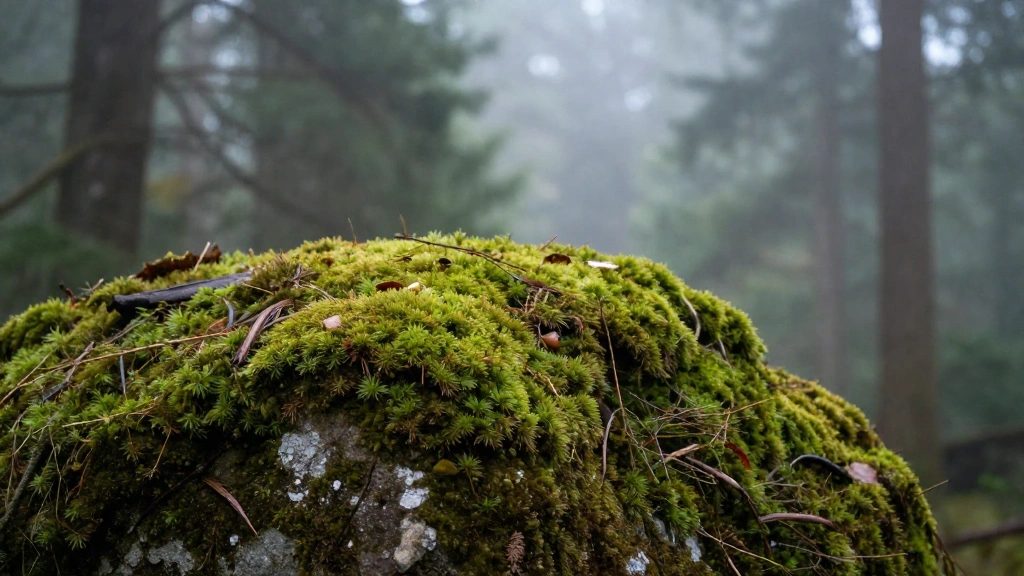
Z-Image-Edit handles the lighting integration, ensuring the product looks like it was actually shot on location, not just pasted on.
Workflow 3: The "Object Addition" (Composition)
Sometimes a scene feels empty. Adding objects with traditional inpainting can be hit-or-miss with scale and perspective.
The Goal: Add breakfast to an empty table.
The Prompt: "Add a cup of coffee and a croissant on the table"

The shadows, reflections, and scale are automatically calculated to fit the existing scene.
Pro Tips for Better Edits
- Be Specific: Instead of "change background," try "change background to a sunny beach at sunset."
- Iterate: If the effect is too strong, try softening your language (e.g., "slightly smile" vs "laugh").
- Keep it Simple: Focus on one major edit at a time for the best stability.
Conclusion
Z-Image-Edit represents a shift from "manipulating pixels" to "directing content." By mastering these natural language workflows, you can speed up your creative process and achieve results that were previously impossible without hours of manual work.
Ready to try it? Start creating with Z-Image today.